上篇中,我们初步探究了 RuoYi 项目是如何进行登录信息传输、验证码校验、密码校验,以及密码存储安全性方案。我们了解到,整个的验证实现是围绕 Shiro 框架进行的,而数据的传输安全性,RuoYi 是没有考虑的,如果我们做的是要求安全等级比较高的项目,需要考虑采用 https 协议,并对关键数据进行加密后传输,一般会使用非对称密码算法进行加解密。
本篇,我们主要会针对 Shiro 框架做一个简单的扩展了解,然后再初窥 RuoYi 的菜单、权限功能。
# Shiro
Shiro 的官网为 Apache Shiro (opens new window),GitHub 仓库为 Shiro (opens new window)。
Shiro 的自我介绍为:Apache Shiro™ 是一个功能强大且易于使用的 Java 安全框架,可执行身份验证、授权、加密和会话管理。使用 Shiro 易于理解的 API,你可以快速轻松地保护任何应用程序——从最小的移动应用程序到最大的 web 和企业应用程序。
Shiro 高层架构,如下图:
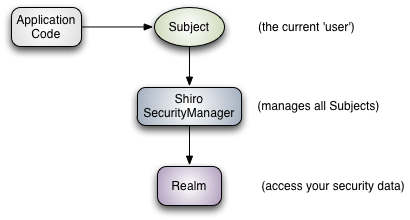
Shiro 有三个主要概念:Subject、SecurityManager 和 Realms。这几个概念,我们在上篇中对 RuoYi 的登录分析中已有所接触。
三大概念,官方大体的介绍如下:
Subject:本质上是当前执行用户的特定于安全的“视图”,它代表的可以是人,也可以表示第三方服务、守护程序帐户、cron job 或任何类似的东西。SecurityManager:SecurityManager是 Shiro 架构的核心,它充当了一种“保护伞”对象,协调其内部安全组件,这些组件共同形成一个对象图。然而,一旦为一个应用程序配置了SecurityManager及其内部对象图,它通常就不存在了,应用程序开发人员几乎所有的时间都在使用SubjectAPI。Realms:Realms充当 Shiro 和应用程序安全数据之间的“桥梁”或“连接器”。当需要与安全相关数据(如用户帐户)进行实际交互以执行身份验证(登录)和授权(访问控制)时,Shiro 会从为应用程序配置的一个或多个Realms中查找许多这些内容。从这个意义上讲,Realm 本质上是一个特定于安全的 DAO。
从以上的概念描述中,可以看出来,Subject 代表认证相关的人或者应用;SecurityManager 是用于认证的核心及桥梁;Realms 则代表用于认证的相关数据及认证方法的提供者。
再看一下 Shiro 的详细架构,如下图:
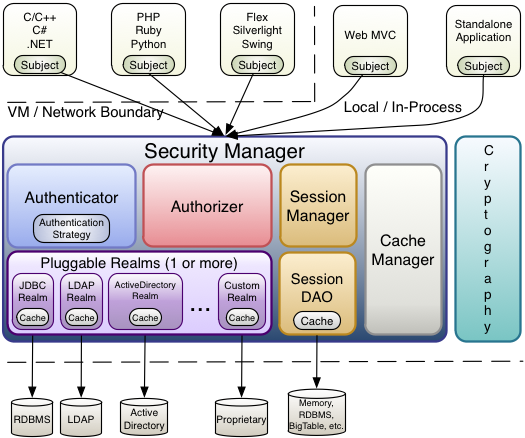
这张图可以看到更多关于 SecurityManager 的组成部分,以及常见的 Realms 的认证数据来源,详细我们不再展开。
# RuoYi 里的 Shiro
RuoYi 项目里对接使用 Shiro 的代码,放在项目 ruoyi-framework 中, 包为 com.ruoyi.framework.shiro。其中涉及定义的 Realms 实现类 UserRealm,将类继承自 AuthorizingRealm,AuthorizingRealm 是一个抽象类,其中抽象方法为:
    /**
     * Retrieves the AuthorizationInfo for the given principals from the underlying data store.  When returning
     * an instance from this method, you might want to consider using an instance of
     * {@link org.apache.shiro.authz.SimpleAuthorizationInfo SimpleAuthorizationInfo}, as it is suitable in most cases.
     *
     * @param principals the primary identifying principals of the AuthorizationInfo that should be retrieved.
     * @return the AuthorizationInfo associated with this principals.
     * @see org.apache.shiro.authz.SimpleAuthorizationInfo
     */
    protected abstract AuthorizationInfo doGetAuthorizationInfo(PrincipalCollection principals);
同时,AuthorizingRealm 还继续自 AuthenticatingRealm,它也是一个抽象类,其抽象方法为:
    /**
     * Retrieves authentication data from an implementation-specific datasource (RDBMS, LDAP, etc) for the given
     * authentication token.
     * <p/>
     * For most datasources, this means just 'pulling' authentication data for an associated subject/user and nothing
     * more and letting Shiro do the rest.  But in some systems, this method could actually perform EIS specific
     * log-in logic in addition to just retrieving data - it is up to the Realm implementation.
     * <p/>
     * A {@code null} return value means that no account could be associated with the specified token.
     *
     * @param token the authentication token containing the user's principal and credentials.
     * @return an {@link AuthenticationInfo} object containing account data resulting from the
     *         authentication ONLY if the lookup is successful (i.e. account exists and is valid, etc.)
     * @throws AuthenticationException if there is an error acquiring data or performing
     *                                 realm-specific authentication logic for the specified <tt>token</tt>
     */
    protected abstract AuthenticationInfo doGetAuthenticationInfo(AuthenticationToken token) throws AuthenticationException;
UserRealm 对两个抽象方法的实现分别如下:
    /**
     * 授权
     */
    @Override
    protected AuthorizationInfo doGetAuthorizationInfo(PrincipalCollection arg0)
    {
        SysUser user = ShiroUtils.getSysUser();
        // 角色列表
        Set<String> roles = new HashSet<String>();
        // 功能列表
        Set<String> menus = new HashSet<String>();
        SimpleAuthorizationInfo info = new SimpleAuthorizationInfo();
        // 管理员拥有所有权限
        if (user.isAdmin())
        {
            info.addRole("admin");
            info.addStringPermission("*:*:*");
        }
        else
        {
            roles = roleService.selectRoleKeys(user.getUserId());
            menus = menuService.selectPermsByUserId(user.getUserId());
            // 角色加入AuthorizationInfo认证对象
            info.setRoles(roles);
            // 权限加入AuthorizationInfo认证对象
            info.setStringPermissions(menus);
        }
        return info;
    }
    /**
     * 登录认证
     */
    @Override
    protected AuthenticationInfo doGetAuthenticationInfo(AuthenticationToken token) throws AuthenticationException
    {
        UsernamePasswordToken upToken = (UsernamePasswordToken) token;
        String username = upToken.getUsername();
        String password = "";
        if (upToken.getPassword() != null)
        {
            password = new String(upToken.getPassword());
        }
        SysUser user = null;
        try
        {
            user = loginService.login(username, password);
        }
        catch (CaptchaException e)
        {
            throw new AuthenticationException(e.getMessage(), e);
        }
        catch (UserNotExistsException e)
        {
            throw new UnknownAccountException(e.getMessage(), e);
        }
        catch (UserPasswordNotMatchException e)
        {
            throw new IncorrectCredentialsException(e.getMessage(), e);
        }
        catch (UserPasswordRetryLimitExceedException e)
        {
            throw new ExcessiveAttemptsException(e.getMessage(), e);
        }
        catch (UserBlockedException e)
        {
            throw new LockedAccountException(e.getMessage(), e);
        }
        catch (RoleBlockedException e)
        {
            throw new LockedAccountException(e.getMessage(), e);
        }
        catch (Exception e)
        {
            log.info("对用户[" + username + "]进行登录验证..验证未通过{}", e.getMessage());
            throw new AuthenticationException(e.getMessage(), e);
        }
        SimpleAuthenticationInfo info = new SimpleAuthenticationInfo(user, password, getName());
        return info;
    }
可以看到,doGetAuthorizationInfo(PrincipalCollection arg0) 代码就是获得一个 SysUser 对象,并给定相应的菜单和用户角色。也就是说用户和权限和菜单绑定都是在这里完成的,而其中最核心的用户数据是从从而来呢?继续看以下核心的一句代码,并跟踪进去:
SysUser user = ShiroUtils.getSysUser();
public static SysUser getSysUser()
{
    SysUser user = null;
    Object obj = getSubject().getPrincipal();
    if (StringUtils.isNotNull(obj))
    {
        user = new SysUser();
        BeanUtils.copyBeanProp(user, obj);
    }
    return user;
}
可以看到,用户信息来源于 getPrincipal(),而它来自于 getProject(),继续跟进,可以找到:
public class ShiroUtils
{
    public static Subject getSubject()
    {
        return SecurityUtils.getSubject();
    }
...
跟进,找到 SecurityUtils 类里的代码实现:
public static Subject getSubject() {
    Subject subject = ThreadContext.getSubject();
    if (subject == null) {
        subject = (new Subject.Builder()).buildSubject();
        ThreadContext.bind(subject);
    }
    return subject;
}
此处逻辑为:从 ThreadContext.getSubject() 中获取 Subject,如果其为 null 则直接构建一个对象,并存入 ThreadContext 中。进入 buildSubject() 的逻辑,代码如下:
public Subject buildSubject() {
  return this.securityManager.createSubject(this.subjectContext);
}
我们再跟进 UserRealm 另一个实现的方法 doGetAuthenticationInfo(AuthenticationToken token),可以看到此方法实现了真正的登录认证,将待认证信息与认证源的数据进行认证对比,确认用户是否可以认证通过。
这个时候我们重新回到 RuoYi 业务中的登录方法 ajaxLogin,观察登录业务到底是怎么通过 Shiro 框架实现的:
UsernamePasswordToken token = new UsernamePasswordToken(username, password, rememberMe);
Subject subject = SecurityUtils.getSubject();
try
{
    subject.login(token);
    return success();
}
这里可以很清晰的看到,此处使用了上文提到的方法 SecurityUtils.getSubject() 来生成 Subject,然后对生成的 Subject 对象执行登录操作。那此处逻辑就很清晰了:在项目初始化配置时,SecurityManager 就已经与 UserRealm 提前绑定,当用户触发到登录时,代码中使用 SecurityManager 生成了一个 Subject 对象,再通过 Subject 定义的 login 方法进行了登录操作,而 login 方法的调用,最终会运行到我们上面分析到的 UserRealm 中的 doGetAuthenticationInfo(AuthenticationToken token) 方法,最终登录成功的话,Shiro 框架会为 Subject 对象添加认证用户的相关信息。
通过以上的代码梳理和分析,我们能比较清晰地体会到 Shiro 三大核心概念的用途。Realm 就是用来比较认证信息是否合法的,核心就是提供认证源用于对比;SecurityManager 与 Realm 提前绑定,提供认证 API 给业务使用,业务 Subject 的 login 方法,实现最终通过 SecurityManger 调用 Realm 中的认证方法进行登录,并赋予 Subject 对象相关数据,最终可通过 SecurityManager 获得用户相关数据对象 Subject,并能从 Subject 中获取自己需要的各种用户信息。
# 初见 RBAC
在上面登录逻辑中,我们看到在 UserRealm 中登录成功后,对用户进行菜单和权限的绑定操作。但比较奇怪的是这段代码,让人感觉疑惑:
roles = roleService.selectRoleKeys(user.getUserId());
menus = menuService.selectPermsByUserId(user.getUserId());
// 角色加入AuthorizationInfo认证对象
info.setRoles(roles);
// 权限加入AuthorizationInfo认证对象
info.setStringPermissions(menus);
我们很明显的可以看到 info 对象的两个方法为 setRoles()(设置角色)、SetStringPermissions()(设置权限),但作者在这处对设置权限函数添加的数据,命名为 menus(菜单)。我们只能有一个初步猜测:RuoYi 系统中,是否没有针对 API 级别的权限控制,而只是针对菜单级进行了控制呢?
另外,SysRole 都有些什么属性,又是怎么对用户操作进行权限控制的呢?菜单是什么样的数据结构,又是怎么进行访问控制的呢?这些 RBAC 相关疑问的解答,我们将在下篇展开。
# 小结
本篇中我们简单的扩展了一下 Shiro 框架的相关知识,并结合 Shiro 框架分析了 RuoYi 项目如何对接使用的 Shiro 框架。
另外,我们还在对接代码中发现了 RBAC 比较核心的权限、菜单等数据。RBAC 神秘的面纱才刚揭开,我们下一篇继续。本篇就到这里,比心,❤。